
Techniques · 8 MIN READ
Cross stitch waste canvas: stitch on ordinary fabric
Plan embroidery on clothing with a temporary counting grid, test material compatibility and remove the canvas using its instructions.
Understand the temporary grid before choosing a project
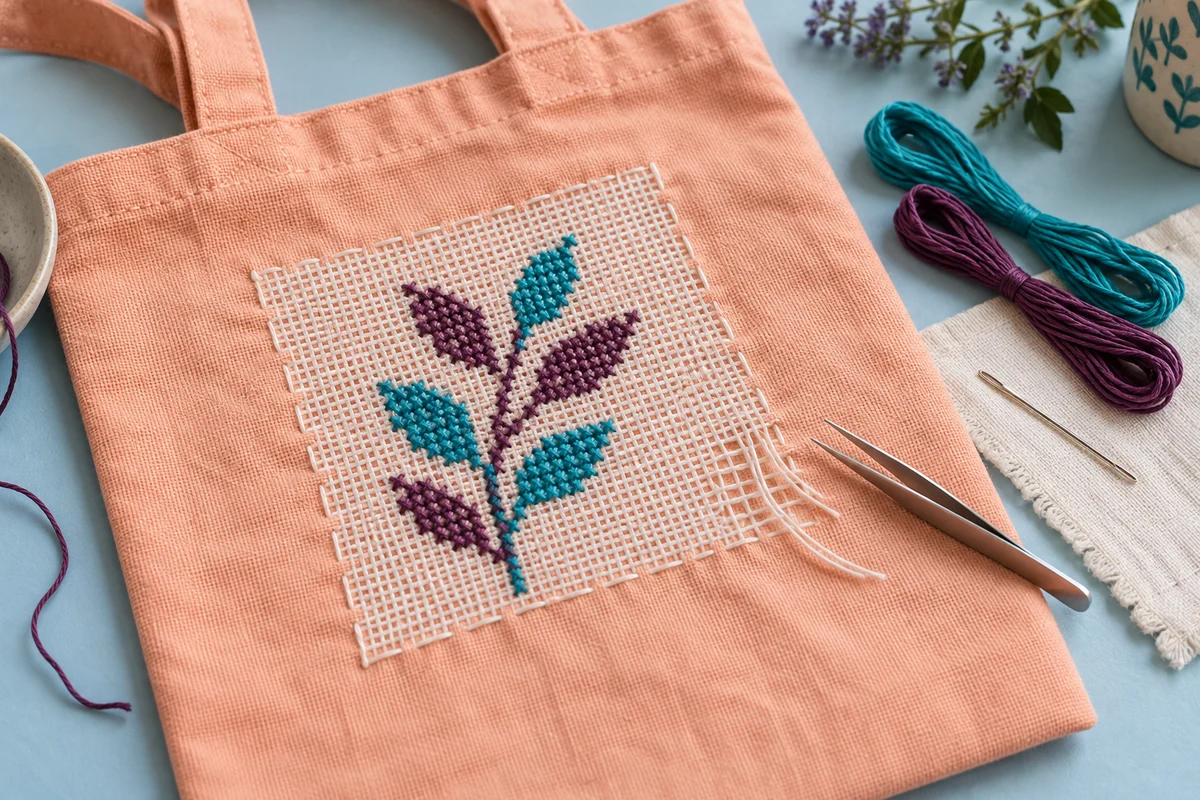
Cross stitch waste canvas supplies a counting grid above a fabric that does not have a convenient regular surface for counted embroidery. After the design is stitched through the grid and the underlying fabric, the temporary canvas is removed according to its instructions. The embroidery remains on the base cloth. This makes placement, material compatibility, and removal part of the project from the beginning.
Identify the actual product you have. Traditional removable-thread waste canvas and water-soluble canvas are different materials with different removal methods. A removable-thread product is withdrawn strand by strand; a soluble product is treated according to its dissolving instructions. Do not rely on a seller's broad use of the word canvas to establish which method applies. Keep the package and care information until the finished item has been inspected.
Begin with a small clear motif on a suitable scrap rather than a large design on a valued garment. The sample should use the same kind of base fabric, thread, and temporary grid as the final project. It lets you check attachment, stitch tension, and removal without making the garment itself the experiment. A leaf, heart, or simple diamond offers useful counting practice while keeping the first trial easy to examine.
Check the final fabric's needs first
Read the care label or material instructions for the base cloth. Your chosen grid-removal treatment must be compatible with that fabric and with the embroidery thread. A process that works on a plain washable cotton sample may not suit a lined garment, a specialty finish, or a thread with different care requirements. Resolve that compatibility before attaching the grid, not after the embroidery is complete.
Choose a location that is accessible from both sides
Plan where the motif will sit on the finished object. Check the garment or bag in its normal shape, not only flattened on a table. A location near a seam, pocket, zipper, or thick fold can be harder to stitch than its appearance suggests. Make sure you can reach the reverse of the area and move the needle without accidentally catching another layer.
Use a paper mock-up of the stitched dimensions to compare placements. Look at the motif when the garment is hanging or when the bag is in use. A design that appears centered on a flat panel may look off-center once that panel curves or folds. Mark or baste the placement only with a method suited to the base fabric. Do not assume an unfamiliar marker will disappear safely.
Keep the size manageable. A small accent leaves less temporary grid to remove and fewer opportunities for placement to drift. Dense coverage can behave differently from an open outline, so choose a sample that represents the actual design. If the garment is stretchy, check how it behaves when held for stitching and released. A grid controls placement but does not automatically prevent the base fabric from being distorted.
Calculate the motif and leave working space
Find the chart's stitch width and height, then use the temporary grid's effective count to calculate the embroidered dimensions. A chart 28 stitches wide at 14 stitches per inch measures two inches across. That is the motif width, not the size of the waste canvas cut. You need enough grid beyond the motif to attach and handle it, using the product's instructions and the planned removal method.
Use the fabric calculator for the embroidery's stitch-size calculation, while planning the temporary grid and base object separately. A shirt does not need to be cut around the design like a new piece of Aida, and the temporary canvas may need a different allowance from the final object. Keep those measurements clearly labeled so a margin intended for one material is not mistaken for another.
Compare the chart with the actual grid before stitching. Some products use grouped threads or reference lines, so read how the maker defines a stitch position. Do not assume every visible thread represents one chart square. Count a short sample row, verify its width, and inspect its corners. A clear understanding of the grid prevents the finished design from becoming larger or smaller than planned.
Make an alignment reference
Mark the chart center and establish a corresponding reference on the temporary grid using an appropriate method. Check the grid's horizontal and vertical directions against the base fabric and the intended design placement. A motif can be counted correctly and still appear tilted if the temporary grid was attached at an unintended angle. Test that alignment on the paper mock-up first when the object's shape makes it uncertain.
Attach the grid without stretching the base fabric
Follow the grid maker's guidance for securing it to the underlying cloth. A suitable temporary basting arrangement can keep the layers aligned while leaving the working area accessible. Inspect the attachment from both sides before adding embroidery. The purpose is to keep the grid in position, not to pull the base fabric into a different shape that it will lose when released.
Choose a working support that suits the combined materials. If using a hoop, fit the layers evenly and check that the base cloth is not stretched excessively in one direction. Keep seams, fasteners, and other thick components clear of the ring where possible. A garment with several layers needs extra care so you do not accidentally stitch through the back as well as the intended front panel.
Keep the edges of the temporary grid stable while working. If it shifts or lifts, pause and reset it before continuing. Repeatedly compensating for movement by eye can change the relative placement of later stitches. Compare the grid with its original alignment reference at natural stopping points. A small early adjustment is easier than discovering a tilted border after its entire outline has been stitched.
Stitch through the intended layers and protect the grid threads
Select a needle suited to the base fabric, thread, and instructions. The needle must pass through the underlying material as well as the temporary grid. A needle that works comfortably between Aida holes may not behave the same way on a tightly woven garment. Test the combination on the scrap instead of forcing an unsuitable needle through the final item.
Place the stitches using the grid's intended openings, taking care not to pierce or trap removable grid threads unnecessarily. Those threads need to come out later. Keep the upper diagonals consistent and the thread tension controlled. The beginner cross stitch guide explains the basic cross sequence, while your waste-canvas instructions define how that sequence is positioned on the temporary material.
Check the reverse regularly. Confirm that only the intended fabric layers are being caught and that thread routes remain manageable. A caught garment lining or back panel can be difficult to release after a large section is completed. When thread snags, identify the obstruction before pulling harder. Excessive force can disturb the grid or pull the base fabric into a dent.
Verify the sample after removing its grid
A successful test is more than a neat front while the canvas is still present. Complete the sample's removal stage according to the product instructions and inspect the embroidery on the base cloth alone. Check shape, spacing, tension, and any remaining temporary fibers. This is the evidence that your setup works for the final project, rather than a promising appearance before the temporary support has gone.
Review the embroidery before beginning removal
Compare the completed work with the chart for missing crosses, incomplete details, and incorrect colors. Make corrections while the grid still supplies clear positions. After removal, finding a missing square may be harder on an irregular base fabric. Keep the chart and thread key available until the entire finished object has been checked.
Remove temporary attachment stitches at the appropriate stage according to the instructions, taking care not to cut the embroidery or base fabric. If the product directs you to trim excess grid, leave the amount needed for its removal method. Do not cut so close to the stitches that you damage them or lose useful thread ends. Identify exactly which material you are trimming before using scissors.
Prepare the removal workspace and treatment from the actual product guidance. For its removable-thread waste canvas, the DMC product instructions describe wetting the canvas and gently withdrawing its threads with tweezers. This is a manufacturer-specific procedure, not a universal washing recipe for every temporary grid, fabric, or thread combination.
Remove the temporary canvas patiently
Follow the required treatment and withdraw removable threads carefully when that is the product's method. Support the embroidered area so pulling does not drag the motif out of shape. Work methodically rather than trying to remove a large bundle at once. Keep track of which direction and area you have cleared, and inspect the embroidery as the temporary structure disappears.
If a thread resists, stop and examine whether it has been caught by an embroidery stitch or remains held by the grid's treatment. More force is not automatically the solution. Consult the product instructions or maker for guidance if the cause is unclear. Avoid improvising strong heat, chemicals, or a different soaking routine on an item whose materials you have not checked for compatibility.
For a soluble product, use its specific dissolving and rinsing instructions rather than pulling at it as though it were removable-thread canvas. Keep the two methods distinct. The goal is a clean embroidered base fabric, and achieving that depends on the actual material. Check for residue or remaining temporary fibers as directed before deciding that the removal stage is complete.
Inspect the garment and keep a repeatable record
Let the item return to its normal state after the required treatment, then inspect the design in its intended position. Check the front, reverse, nearby seams, and overall shape. A neatly counted motif should also sit comfortably on the finished object. Follow the base fabric and thread care instructions for any remaining finishing steps rather than applying a routine intended for another embroidery material.
Record the grid product, count, base fabric, thread, needle, attachment method, and removal process. Add what the sample revealed and any changes made before the final piece. The project progress tracker can record sessions, while your notes preserve the practical setup. For a later project, begin with those tested details and repeat the compatibility check if any material changes.
Waste canvas is most useful when treated as temporary guidance within a complete plan. Choose a suitable location, attach the grid without distortion, verify the stitching on a representative sample, and reserve time for careful removal. Those decisions let the final embroidery belong to the garment or bag naturally, with the temporary counting surface serving its purpose and then leaving the project.
Choose an original chart from our free collection, or check your fabric measurements before you begin.
Free cross stitch patterns · Fabric calculator