
Patterns · 9 MIN READ
Butterfly cross stitch patterns: balance wings and color
Design an original butterfly with balanced wings, clear grid outlines, readable color contrasts and measured space for finishing.
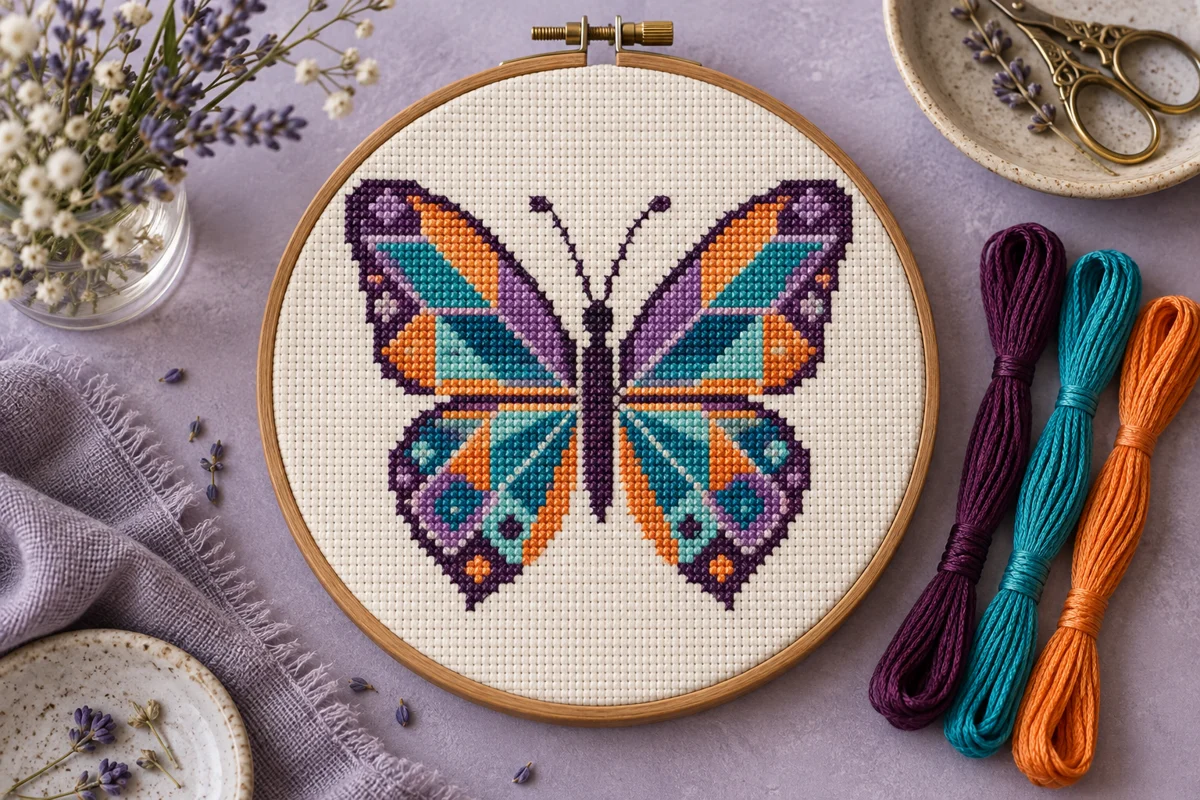
Start with a butterfly silhouette that reads clearly
A butterfly cross stitch pattern works best when its outline remains recognizable before you add spots, veins or shading. The two upper wings usually provide the broadest shapes, the lower wings give the design its character, and a narrow central body anchors both sides. You can make an original decorative butterfly without reproducing a particular species. Decide whether your aim is a simple emblem, a colorful gift or a more detailed nature study, because that choice controls how much information the grid needs to hold.
Begin with a pencil sketch on squared paper or use the grid designer to explore a silhouette. Work with a modest number of squares so you can see every decision. A large painted curve can hide awkward corners that become obvious when reduced to stitches. Fill the main wing shapes in a single color first, then step back from the screen or paper. If the result looks like four disconnected leaves, adjust their position around the body before decorating their interiors.
Choose an original decorative or observational approach
For a decorative design, choose your own combination of wing shapes and markings. Use nature as inspiration without presenting invented colors as an accurate species identification. For an observational design, work from a photograph you took or another reference you have permission to use, and record the identifying features you intend to preserve. A chart must simplify those features, so accuracy depends more on their arrangement than on adding every tiny mark visible in the photograph.
Set the center line before building the wings
Draw the butterfly's vertical center line on your working grid. An odd total width lets the body occupy a central column; an even width places the axis between two columns. Either approach can work, but choose deliberately. Switching between them halfway through a chart can shift one wing by a square and leave the body looking detached. Mark the intended center on the chart and keep the fabric center separate from any decorative border you add later.
Build one upper wing first, using the body as a reference. Mirror its occupied squares to the other side, then draw the lower pair. Symmetry is a useful starting structure rather than an obligation to make every color identical. You might repeat the outline exactly while changing a small interior detail, or design a butterfly at an angle with intentionally different wing widths. In either case, define the rule before stitching so you can distinguish a planned difference from a counting error.
Check the four wing attachment points
Look closely at the squares where each wing meets the body. A narrow accidental gap can make the wing appear to float, while too many connecting squares can create a bulky central block. Try the design without antennae and border details so those additions cannot disguise an unresolved join. Compare left and right coordinates from the same center reference. Counting from different outer edges introduces unnecessary opportunities for drift, particularly when the two outlines have several stepped corners.
Turn curves into deliberate stepped outlines
Cross stitch gives you a grid of small diagonal crosses rather than a continuous drawn line. A rounded wing edge therefore becomes a sequence of short horizontal and vertical steps. Look for a consistent rhythm as the outline travels around the upper wing. An isolated square sticking out from an otherwise smooth sequence may look like an error at the final scale. Conversely, a deliberate notch in a lower wing can add character if it is clearly supported by neighboring squares.
Review the shape at its intended display size instead of judging only an enlarged chart. One square can make a substantial difference in a miniature butterfly and very little difference in a broad sampler. If a curved border needs many partial stitches to remain convincing, consider making the motif larger or simplifying the contour. A beginner-friendly version can use full crosses throughout. The mini pattern guide explains how removing small details can strengthen a compact design rather than weaken it.
Do not rely on backstitch to repair every weak edge. A darker outline can clarify a wing, but it also changes the visual weight of the whole butterfly. Test a short section with and without the outline before choosing. If you include backstitch, show it distinctly in the key and make its path readable across the colored squares. Keep antennae equally clear, with enough separation that they remain recognizable instead of becoming an indistinct cluster above the head.
Build a color palette around value and repetition
Choose a small initial palette with a dark anchoring color, a medium wing color and a lighter accent. Hue gives the butterfly its personality, while value determines whether the markings remain visible. Two bright colors may look different on their skeins but merge when stitched together under indoor lighting. Lay the actual threads on the actual fabric before committing to a palette. Make a few crosses beside one another if the contrast is difficult to judge from loose strands alone.
Repeated color placement helps the two wings feel connected. You could place a darker patch near the body, a medium area through the center and a lighter spot near each outer edge. This is a design choice, not a universal biological rule. Use the same placement language on both sides if balance is your aim. When you add a fourth or fifth color, give it a clear purpose, such as separating adjacent areas or creating a focal spot, rather than scattering it throughout the chart.
Keep spots readable on the chosen fabric
Small wing spots need enough space around them to look intentional. A single pale cross enclosed by dark stitches may read clearly; several touching pale squares can become a stripe. Test both arrangements on the grid before selecting one. Unstitched fabric can also act as a light area, but its color is then part of the palette. An ivory gap on one fabric will become a blue gap on another. Record that dependency if you share the finished design with someone who might choose a different ground.
Calculate size and leave room for the finish
Count the full chart width and height, including antennae, scattered accents and any border. Divide those stitch counts by the number of stitches per inch you will actually make to estimate the stitched dimensions. For a 56-square-wide design worked over one square on 14-count Aida, the stitched width is four inches. A height of 42 squares produces three inches. These are dimensions of the stitching, not cutting measurements for the fabric, so they do not include space for holding or finishing.
Use the size calculator to compare fabric choices, and confirm whether your technique works over one fabric square or over more than one thread. A fabric count printed on a package does not by itself establish the number of stitches you will make per inch on every material. The fabric guide helps separate those choices. Keep the same stitch-count chart when comparing sizes so you can see the effect of the fabric rather than accidentally changing two variables at once.
Choose the final object before cutting. A framed butterfly needs margins suited to the mounting method, a greeting card needs an opening that reveals the whole motif, and a sewn patch needs room for its edge treatment. Allow working space for the hoop or frame as well as finishing space. Draw the proposed opening around a paper mockup of the design. This simple check can reveal that the antennae sit too close to the top edge even when the wings appear comfortably centered.
Stitch from reliable reference points
Locate the chart center and establish the corresponding starting reference on the fabric. You can begin at the body or another clearly counted area, but verify its position against the full design before filling a wing. The body is a convenient anchor because both sides refer to it, yet a long narrow column can still be stitched one square too high. Check the first few stitches against a second landmark, such as the upper wing attachment, before the surrounding blocks make correction more time-consuming.
Work in manageable sections and compare the finished outline with the chart regularly. If you fill an entire upper wing without checking its width, a small early counting error can carry through many rows. Count the distance from the body to a clear outer corner, then compare that distance on the opposite side. Mark completed chart areas in a way that preserves the symbols beneath them. Keep notes about your actual thread substitutions so a later session does not depend on remembering which similar-looking skein you chose.
Keep the top leg of each cross consistent across the motif. Changes in direction can reflect light differently and make one wing look patchier even when the colors match. When carrying thread between separated spots, consider the fabric color and the visibility of the back through open areas. Ending and restarting may produce a cleaner result than a long dark carry behind pale fabric. The appropriate decision depends on the actual spacing and material, so inspect the sample rather than applying one fixed distance to every project.
Add a border or companion motif with restraint
A butterfly can stand alone or sit within a small arrangement of leaves, flowers or lettering. Give companion motifs a supporting role. If their dark outlines are as large and dense as the butterfly, they may compete with its wings for attention. Try the main motif on its own first, then add one element at a time. The flower design guide offers a useful way to think about readable petals and stems without assuming that more decoration always creates a stronger composition.
Leave a deliberate gap between the butterfly and any surrounding frame. A wing tip that nearly touches a border can appear cramped, especially after mounting hides some fabric. Count that gap at its narrowest point, including antennae or a backstitched flourish. If you add a name or short phrase below the motif, chart its actual letter spacing before deciding the fabric size. A title that fits as handwriting may take considerably more width when converted to a clear stitched alphabet.
For a set of butterflies, vary one feature at a time. Keep the outline stable while changing the palette, or keep the colors stable while changing the lower wing shape. That approach makes the collection feel related and helps you understand which choice produced the effect you like. A sampler can also repeat the same butterfly at different positions with consistent gaps. Sketch the entire arrangement before stitching the first one so the final motif is not squeezed into the remaining corner.
Review the finished design and save useful notes
Before finishing, compare the stitched work with your chart in good light. Check the body alignment, corresponding wing corners, missing accent crosses and any backstitch paths. Intentional asymmetry should still follow your design rule. If an unexpected difference appears, decide whether correcting it improves the result before unpicking. A decorative motif does not need photographic precision, but visible counting mistakes should not be described as planned details simply because they are inconvenient to repair.
Follow the care information for the fabric and threads when cleaning or pressing, and test uncertain materials on a separate sample. Finish according to the object you chose, keeping the motif evenly positioned and avoiding unnecessary distortion. The framing guide covers considerations for a displayed piece. A butterfly intended for a sewn object needs its own practical construction plan; an attractive stitched sample does not automatically provide a washable, durable patch or bag panel.
Save the final chart version, fabric details, thread list, substitutions and a photograph of the completed project. Note the dimensions that actually resulted after finishing. These records make it easier to repeat the design, resize it thoughtfully or explain your choices to another stitcher. When sharing a pattern, provide your own original chart and accurate instructions, and respect the permissions of any reference material you used. The most useful butterfly pattern is one whose silhouette, color key and working references remain clear from the first counted square to the final mounted piece.
Choose an original chart from our free collection, or check your fabric measurements before you begin.
Free cross stitch patterns · Fabric calculator