
Patterns · 10 MIN READ
Cross stitch flowers: build a balanced botanical design
Draw recognizable flower shapes, choose a small thread palette and build a balanced botanical chart for your next project.
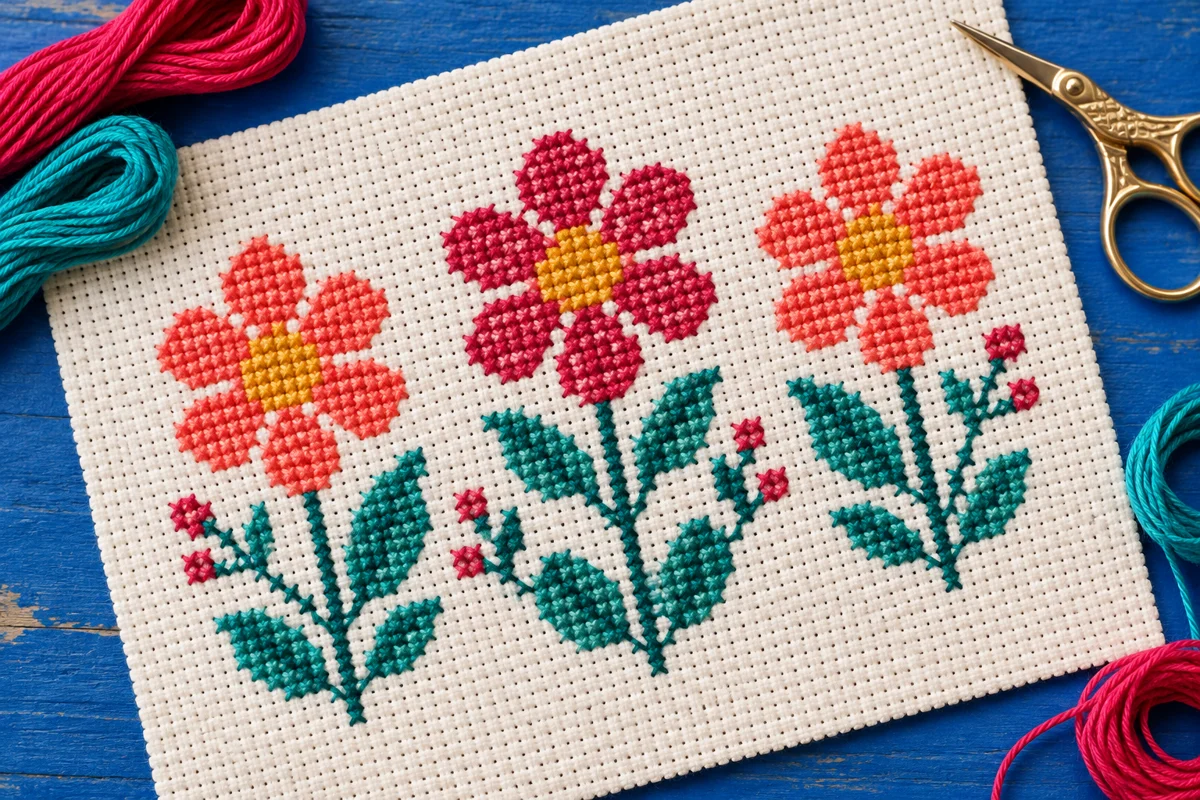
Start with a flower you can recognize in a small grid
Cross stitch flowers work best when the shape remains clear before you add fine detail. A flower photograph contains hundreds of changes in light, but a small stitched motif may have room for only a handful of colors. Begin with the outline: the width of the bloom, the direction of its stem, and the placement of its leaves. If those features communicate the flower, extra shading becomes an option instead of a rescue attempt.
Choose one purpose for your design. A bookmark needs a narrow arrangement with room above and below the flowers. A square framed piece can support a central bouquet. A repeating border needs motifs that connect without creating awkward gaps at the corners. Deciding on the finished object first saves you from drawing a beautiful chart that does not fit the place where you want to use it.
For a first original botanical design, make three upright flowers rather than a dense bouquet. Give the middle stem a little more height and let the outer stems lean inward. Use separate leaves so that the stems do not merge into one dark block. This simple arrangement gives you practice in counting, repeated shapes, and color placement while keeping the construction easy to inspect.
Describe the silhouette before choosing colors
Write a short description of the subject: a cup-shaped bloom, a rounded daisy, or a tall spike of small flowers. Then sketch that silhouette on paper. You are looking for the few features that distinguish it, not a botanically exact drawing. A tulip-like motif can be suggested by an upright cup and two pointed leaves; a daisy-like motif needs a visible center surrounded by petals. Test both ideas as plain outlines before building a palette.
Give the composition a defined stitch area
Set a working rectangle before drawing individual petals. For example, a design 56 stitches wide and 70 stitches high leaves enough space for three modest stems and a little air around them. At 14 stitches per inch, the stitched area measures 4 inches by 5 inches. That measurement describes the embroidery itself, so your fabric cut must also include the extra material needed for handling and your chosen finish.
Use the fabric size calculator to compare fabric counts before cutting. The same chart becomes physically smaller on a fabric that produces more stitches per inch. Do not change both the chart and the fabric at once unless you are ready to check the complete layout again. A flower that looks spacious on a large chart preview may become quite compact when stitched.
Draw a vertical guide through the middle of your rectangle and a horizontal guide through its center. These are planning marks, not stitches. Position the main bloom slightly above the horizontal midpoint so the stems have enough room below it. Check the widest pair of leaves against the side margins. It is easier to move a leaf on paper than to discover at the end that it extends into the space needed for framing.
Keep a margin inside the chart
Leave some unstitched squares between the outermost petals and your working boundary. This internal breathing room is separate from the fabric margin outside the chart. A motif can technically fit its rectangle while still feeling squeezed. Compare a version with two blank squares at the sides against a version with five or six. The better choice depends on the finish, but the comparison makes the spacing decision visible.
Build a small palette with clear roles
Choose colors by function. One color supplies the main petals, another supplies their darker edge or shadow, and a third may provide a light accent. Leaves can use a main green and a darker green if the design needs more definition. A flower center may need a separate warm color. Start with this small set and add another shade only when you can explain what it improves.
Adjacent colors must be different enough to read on the fabric. Two beautiful pink threads may look nearly identical once their crosses sit beside each other. Place short thread lengths together on the actual cloth and view them from the distance at which someone will see the finished piece. This test is especially useful for pale petals on cream fabric and dark foliage on a deep background.
Use the thread color palette tool as a planning aid, then compare physical thread where possible. Screen colors depend on the display and lighting, so a digital preview cannot guarantee an exact thread match. Keep a written key that identifies every selected shade and its symbol. If you substitute a thread later, record the change before the original and replacement skeins become mixed together.
Make shading follow the form
Put your darker petal color where a fold or overlapping petal would create a shadow. Avoid scattering isolated dark stitches simply to make the flower look detailed. A connected band of two or three darker stitches often reads more clearly than several single dots. Likewise, a highlight should describe a surface facing the light, rather than forming a random stripe through the bloom.
Turn curves into deliberate stepped edges
A cross stitch chart is a grid, so curves become steps. Work around the outside of one petal and examine the sequence of horizontal and vertical changes. If every row narrows by the same amount, the petal may look like a triangle. Varying the sequence can create a rounder impression: hold a width for two rows, narrow by one square, then narrow again closer to the tip.
Do not expect a tiny motif to contain every detail of a large flower. A petal only four stitches wide cannot support several layers of shading and a complex outline. Choose the simplest version that reads clearly at the intended size. You can always expand the motif later, but adding colors to an overcrowded shape usually makes its weaknesses harder to see rather than solving them.
Use cross stitch graph paper to draw several variations side by side. Label them with their widths and heights so you can compare them fairly. One version might have rounded petals and another sharper petals, while both occupy the same area. Step back from the page to judge the whole flower. Looking at individual squares for too long can hide an unbalanced silhouette.
Separate neighboring flowers
When two blooms touch, decide whether the contact represents an overlap or an accidental collision. A clear overlap can work, but a few scattered connecting squares may make both flowers difficult to identify. Try leaving a narrow gap between them, or give the front flower a stronger edge. Check the design in a simple black-and-white preview as well as in color; the overall shape should still make sense.
Draw stems and leaves that support the blooms
Stems lead the eye through the composition. Keep their direction consistent with the placement of each bloom, and check that a stem actually meets the flower it supports. In a small full-cross design, a thin stem may be one square wide for much of its length. Sudden changes to three squares wide can look like a lump unless they serve a clear purpose, such as the junction of two branches.
Leaves need their own readable shapes. Give each leaf a point, a broader middle, and an attachment that fits the stem. Alternate their heights when you want a natural rhythm, or mirror them deliberately when you want a formal sampler. Both approaches can work. Problems arise when the design is almost symmetrical but contains one unexplained shift that makes the arrangement feel accidental.
Check the balance of dark green against lighter petals. A large mass of foliage can dominate a delicate bloom even when every leaf is drawn neatly. Remove one leaf and compare the result before adding more flowers. Empty space can help the viewer understand the plant. You do not need to fill every available square with embroidery for the piece to feel complete.
Plan the stitching route before threading the needle
Find the chart center and the fabric center, then decide where to begin. For a small botanical arrangement, starting near the central flower or its main stem gives you a useful reference for the surrounding motifs. If you prefer to start elsewhere, count carefully from the center and verify the position in two directions. A correct vertical count alone does not establish the horizontal placement.
Stitch a manageable section in one color, marking the chart as you complete it. Keep the top legs of your crosses facing the same direction across the design. Repeated petals make this consistency easy to see. Avoid carrying thread across a large open area merely because the next flower uses the same color; starting a new length may leave a cleaner result, especially when the cloth is pale or translucent.
Use the beginner cross stitch guide if you need a refresher on reading symbols and completing crosses. Before working a complicated junction of stems, compare the chart with the stitches you have already made. Count from a nearby confirmed feature rather than from an uncertain unfinished edge. Correcting a small counting mistake early prevents it from spreading into the next bloom.
Sample the most uncertain detail
If you are unsure about a pale petal, a narrow stem, or a particular thread combination, stitch that detail on a spare piece of the same fabric. A sample does not need to include the whole design. A few rows can show whether the contrast is sufficient and whether your chosen strand count produces the appearance you want. Keep the sample beside your chart as a reference while stitching.
Adapt one motif for several useful finishes
A single flower can become a series without requiring a new chart from scratch. For a bookmark, repeat it vertically with measured gaps and keep leaves within the narrow working area. For a greeting card, use one bloom and allow room for the card aperture around it. For a framed trio, vary the heights while keeping the palette consistent. In each case, recalculate the complete stitched dimensions before cutting the fabric.
If you want a border, repeat the motif on paper first and test the join between repeats. The gap after the last flower must suit the gap before the next one. Corners deserve a separate drawing because a straight repeat rarely turns neatly without adjustment. A small corner leaf or a deliberate blank space may solve the transition more cleanly than squeezing an extra flower into it.
Consider the practical finish before adding embellishments. Beads can affect the depth needed behind glazing, and a raised detail may catch on something used every day. A flat bookmark and a decorative wall piece have different needs. For guidance on displaying a finished piece, see the cross stitch framing guide, and check the requirements of your specific frame or mount before committing to an unusual surface detail.
Review the chart and keep a useful project record
Before starting the final piece, inspect the chart one row at a time. Look for stray single stitches, symbols that are too similar, disconnected stems, and changes in petal width that have no visual purpose. Then review the whole composition at a smaller scale. These two checks catch different problems: the close view reveals counting and notation issues, while the distant view reveals imbalance and crowded spacing.
Keep a record of the chart version, fabric count, thread choices, strand count, and any alterations. Add the finished dimensions after stitching. These notes make it easier to create a matching companion piece or repeat the design as a gift. If you change a petal midway through the project, update the paper or digital chart as well, so the next attempt does not reproduce an error you have already solved.
For original flower designs, use your own sketches or photographs, or reference material whose permitted use you have checked. A generic flower subject does not automatically make another person's chart available to copy or redistribute. When using a purchased pattern, follow its terms and credit the designer when appropriate. A small personal botanical chart is also a good opportunity to develop your own shapes, palette, and spacing decisions from the beginning.
The final check is simple: can you recognize the flowers, follow the stems, and distinguish the petals from the background? If the answer is yes, the design has a sound foundation. Add detail only where it strengthens that foundation. A modest chart with clear shapes, thoughtful color roles, and room to breathe can be more satisfying to stitch than a crowded arrangement that asks every square to do too much.
Choose an original chart from our free collection, or check your fabric measurements before you begin.
Free cross stitch patterns · Fabric calculator