
Getting started · 8 MIN READ
Cross stitch project bags: organize a work in progress
Organize a work in progress with measured storage, clear thread labels, secure tools and a simple setup and put-away routine.
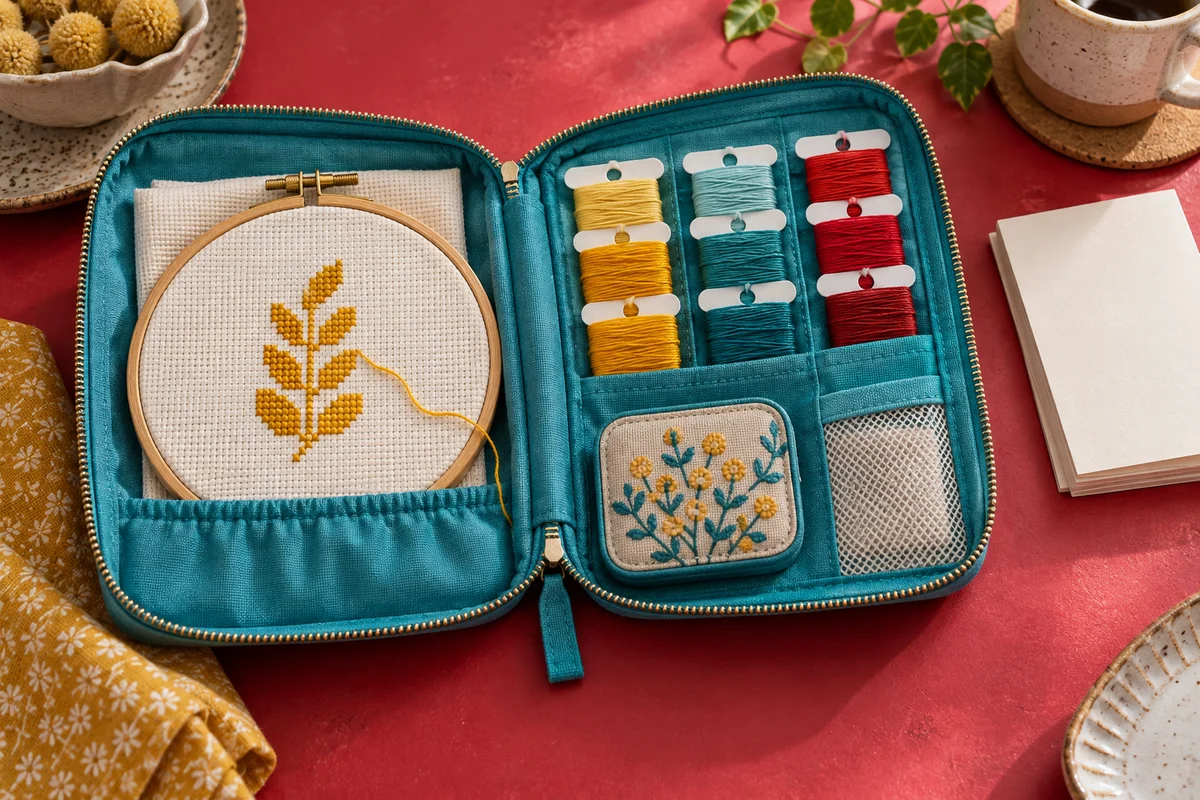
Organize the project before choosing its bag
A cross stitch project bag works best when it holds a defined set of supplies rather than everything you own. Start by laying out the materials for one work in progress: fabric, chart, key, thread, needles and the tools you actually use. Include the hoop or frame if you intend to transport it. This inventory shows the size and shape the bag needs to accommodate. A pouch that looks generous when empty may become cramped once a rigid hoop and folded chart are inside.
Decide where the project will travel. A bag used between rooms has different demands from one carried inside a commuter backpack or packed for a long journey. Think about pressure, spills, dust and how often you need access to the chart. Choose a storage arrangement that makes setting up and putting away the work straightforward. The goal is to protect the materials and reduce searching, not to create so many compartments that each short stitching session begins with unpacking a complicated system.
Keep storage separate from the finished object
A project bag stores a work in progress; it does not determine how the embroidery will eventually be framed, sewn or displayed. Preserve the fabric allowances and finishing instructions while organizing the supplies. Do not trim a large panel merely to make it fit a small pouch. Our cross stitch bag guide covers decorating a finished bag with stitching, which is a different project from choosing storage for your current embroidery.
Measure the hoop, fabric and chart together
Measure the widest and tallest rigid item you plan to carry. A hoop's screw can extend beyond its circular frame, while a scroll frame has projecting parts that need their own clearance. Check the bag's usable opening as well as its internal dimensions. An object can fit the main compartment but fail to pass comfortably through a narrow zipper opening. Test with the actual equipment where possible rather than relying only on the bag's advertised outside measurements.
Consider whether the fabric will travel in its hoop or be removed between sessions. Follow an appropriate method for your materials and project, and inspect any pressure on completed stitching. If the fabric is removed, reserve space to store it without forcing repeated folds through raised details. If it stays mounted, the bag should not squeeze the hoop so tightly that the fabric or surrounding supplies are compressed. The hoop guide discusses handling and repositioning the work during stitching.
Charts also need a practical arrangement. A full paper chart, a folded section and a digital device take different amounts of space. Keep the color key and special-stitch instructions with the part you are using. A single chart page without its key can leave you unable to interpret a symbol after a break. If you use a device, consider its existing protective case and keep it separate from loose tools that could rub against it.
Compare soft pouches, structured bags and compartments
A soft pouch can be light and easy to place inside another bag. It may suit a compact project with a small hoop and a limited palette. Its flexibility does not provide the same protection from external pressure as a more structured case. Check where the pouch will be carried and whether other items will press against it. Avoid assuming that a soft fabric exterior makes every object inside safe from bending or impact.
A structured bag can help preserve space around the supplies, but it may take more room even when partly empty. Look at the opening and how easily you can see the contents. A rigid compartment that holds a chart flat can be useful, while one that makes the hoop difficult to remove may become frustrating. Test the complete setup and removal sequence rather than evaluating storage capacity alone.
Use compartments for clear jobs
Give each compartment a purpose: active threads, secure tools, chart documents or spare materials. Small pockets are helpful when their contents remain identifiable. They are less useful when several nearly identical loose items disappear into them. Keep your essential needle storage in a dependable location and check it when closing the bag. A decorative pocket should not be mistaken for a secure container for sharp tools merely because it has a convenient size.
Keep needles and scissors contained
Use a suitable closed needle case or another secure needle-storage method when the project is packed. A needle resting in the fabric can be overlooked, dislodged or pressed against something else. Check the work before putting it away and account for the needles you used. A needle minder can be helpful during a session, but transport still calls for a deliberate check of how the needle is secured and whether it can become loose in the bag.
Protect scissors with a suitable sheath or closed storage arrangement so their points do not catch on fabric or rub against a chart or device. Keep them accessible enough that you do not need to empty the whole bag to find them. If your bag has a tool section, test whether the scissors remain in place when the bag changes orientation. A pocket that works on a flat table may not hold its contents when carried upright.
Keep craft tools away from children and pets, and inspect the work surface as well as the bag after a session. Organization is useful because it helps you notice when something is missing. It is not a guarantee that every sharp item is safely contained. If you carry supplies on a journey, check the current rules of the relevant transport provider before packing tools; a storage recommendation does not establish what an operator permits.
Label thread without losing the project's key
Keep thread identification connected to the chart's symbols and color references. A thread organizer should preserve the information you need to select the right color later. Similar shades can be difficult to distinguish under different lighting, and a photograph of sorted threads may not reliably replace written labels. Use a consistent system and make sure the labels remain readable after repeated handling.
Avoid storing loose lengths in a way that encourages tangling with tools or other colors. Choose bobbins, cards, small labelled bags or another organizer that suits your thread and working method. There is no need to force every project into the same system. A kit with pre-sorted lengths may be easier to keep in its supplied organizer, while a project using full skeins may need a different arrangement. Keep unused reserves separate from the active lengths if that makes the daily setup clearer.
Record substitutions explicitly
If you replace a color, record the original reference and the replacement in the project notes. Do not rely on remembering that the darker blue in the bag is the substitute. Also note changes to strand count or special-stitch materials. Those details affect how you resume the work and what you need for repairs. The project tracker can hold progress notes, but keep the chart and key themselves available with the project.
Pack fabric so completed stitches remain protected
Inspect the fabric before folding or rolling it. Raised beads, knots and other details should not be crushed beneath a stack of tools. Use a packing arrangement appropriate to the actual embroidery and available space. A clean protective layer can help separate the work from other contents, but it should not introduce rough edges or transfer marks to the fabric. Test the arrangement with a sample if a particular material or finish is unfamiliar.
Keep the bag and its contents dry and reasonably clean. Do not pack damp fabric after cleaning or place the project beside an unprotected drink container. A pouch labelled water resistant does not necessarily protect everything inside from all spills or immersion. Treat such claims according to the product's actual instructions. For ordinary storage, a separate closed area for food and drinks is more useful than expecting the project bag to solve every possible spill.
Avoid compressing the project simply to close the zipper. If the packed shape is strained, reduce the contents or choose a more suitable size. Check that thread and fabric are clear of the closure before pulling it shut. A zipper catching the edge of the embroidery can damage more than an inconvenient loose accessory. Arrange the work so opening and closing the bag remain calm, repeatable actions rather than a tight squeeze.
Create a short setup and put-away routine
Choose a routine you can follow at the end of a brief session. Save your current chart position using the method permitted for your copy, note the next task, secure tools and check the thread labels. Record progress without obscuring information you may need later. If you annotate a chart, preserve the key and relevant instructions. Keep a spare copy only where your pattern's terms allow it rather than assuming that every download permits unrestricted copying.
Prepare a simple next-session note when stopping in the middle of an area. Identify the color, chart section and a verified reference point. This is particularly helpful after a long break, when an unfinished row can be difficult to interpret. The beginner guide explains counted references, and the small pattern guide offers planning advice for compact projects that can be easier to transport.
Test the routine by packing the bag, putting it aside and setting up again later. Notice what you have to search for and what becomes tangled or hidden. Adjust the compartment assignments based on those observations. A bag that supports your actual habits is more valuable than a visually perfect arrangement that takes too long to maintain. Keep the system simple enough that you still use it when you are tired or have only a few minutes available.
Review the storage as the project changes
The contents may change as the embroidery grows. A largely blank fabric panel has different handling needs from one covered with stitches or raised embellishments. Finished sections may require more careful support, while completed colors can move out of the active organizer. Review the packed arrangement at useful milestones rather than assuming the first setup remains ideal until the final stitch.
Keep the final chart, thread references and finishing notes together when the work leaves the project bag for assembly or framing. Clean and inspect the empty bag before starting another project, checking pockets for tools, short threads and forgotten accessories. A well-organized cross stitch project bag helps you protect the work, find the right supplies and resume confidently. Its success comes from suitable dimensions, clear labels and repeatable checks that fit the way you actually stitch.
Choose an original chart from our free collection, or check your fabric measurements before you begin.
Free cross stitch patterns · Fabric calculator