
Techniques · 8 MIN READ
Cross stitch French knots: control wraps and placement
Practise French knots with your actual fabric and thread, control their size, read chart positions and troubleshoot common problems.
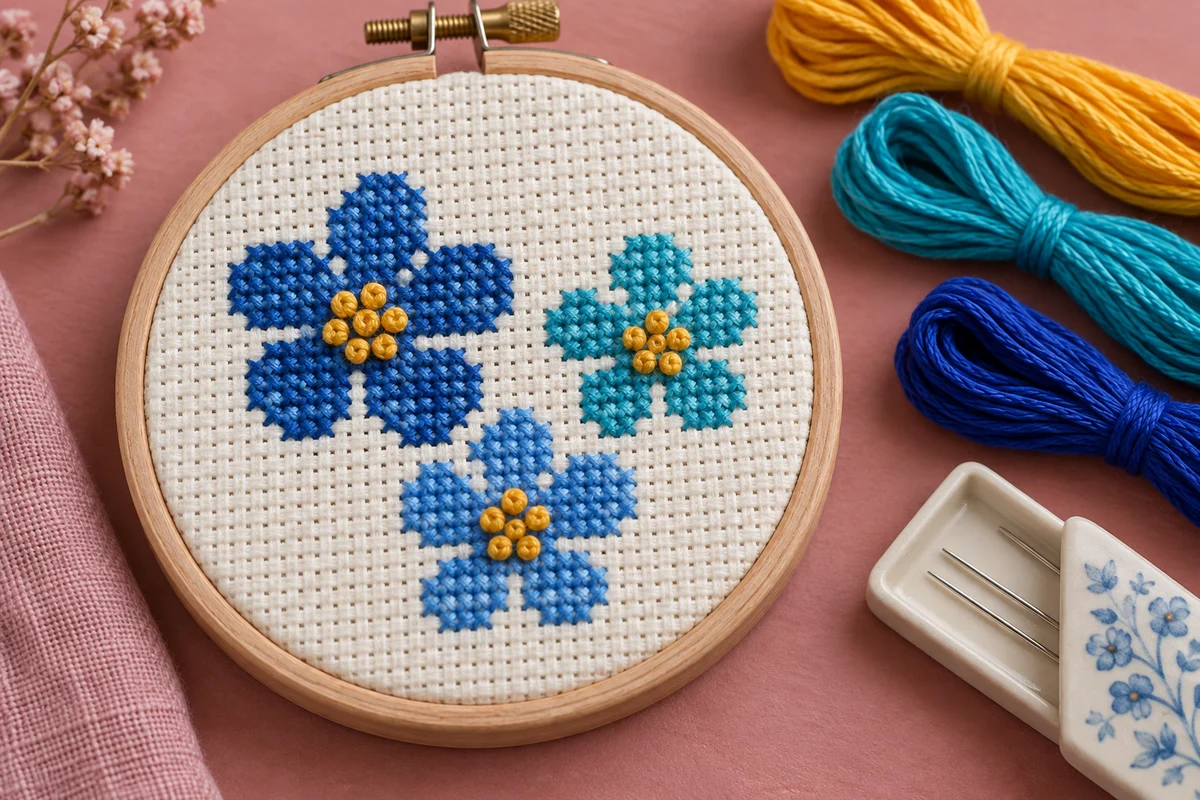
Understand what a French knot adds to a chart
A cross stitch French knot creates a small raised dot rather than an X that fills a counted square. Designers use it for details such as flower centres, scattered texture or a tiny feature that would look too square as a full cross. Its position may fall at a grid intersection, in a stitch centre or somewhere else specified by the chart. Read the special-stitch instructions before treating every round symbol as a knot. Symbols have meanings within their own key, not a universal meaning across every pattern.
The knot's appearance depends on thread thickness, the number of wraps, tension and the way it sits on the fabric. This makes a practice sample particularly useful. A full cross has a clearly defined square, but a knot can vary even when its chart position remains unchanged. Aim for a controlled, repeatable result that suits the surrounding stitching. You do not need to make every knot as large as possible for it to be visible.
Read the instructions separately from the picture
Check the required thread color, strand count and wraps. The instructions may specify a different strand count for knots than for crosses or backstitch. A photograph of the finished design can help you understand the intended effect, but it cannot reliably tell you all those technical choices. Keep the key beside the chart while practising. If you are still learning the counted basics, use the beginner cross stitch guide before adding raised details to a large project.
Prepare a small sample with the actual materials
Use spare fabric of the same type and count as your project. A knot that behaves well on closely woven cotton may pull differently against the larger holes of Aida. Use the intended thread and test the chart's strand count first. Leave enough fabric around your sample to hold it comfortably. A tiny scrap that slips between your fingers makes it difficult to control the thread and tells you less about how the stitch will behave on your actual work.
Choose a needle that carries the thread comfortably and suits the required placement. A tapestry needle works naturally through existing fabric holes; piercing a fabric block calls for a needle capable of that task. Avoid forcing an unsuitable needle through the cloth. Check that the eye passes through the wrapped thread without excessive resistance. A very bulky needle-and-thread combination can make a compact knot harder to form, so test the combination before changing the instructions on the main project.
Prepare the thread so that it lies smoothly and use a manageable length. Longer thread is not automatically more efficient when the stitch involves wrapping and controlled pulling. If your working thread becomes twisted or worn, replace it rather than repeatedly tightening a rough loop. Support the fabric so both hands can work comfortably if that helps you control the wraps. Our hoop guide explains how to hold fabric without pulling it out of shape.
Practise the basic motion slowly
Bring the threaded needle from the back to the front at the intended knot position. Hold the working thread under gentle control with your other hand and wrap it around the needle as directed by your pattern. Keep the wraps together near the needle tip. Return the needle to the fabric very close to the emergence point, using a separate entry rather than simply sending everything back through the same open hole. Pull the needle through while keeping the wraps seated near the fabric surface, then release the controlled thread as the knot settles.
That sequence is easier to understand when you see the movement. The DMC French knot video provides a visual reference for the technique. Practise slowly instead of trying to imitate the demonstration's speed. The important relationship is between the wraps, their contact with the fabric and the thread being pulled through them. Pulling hard at every stage can make the movement less predictable, especially when the thread catches at the needle eye.
Keep the knot compact without dragging the fabric
Controlled tension means preventing the wraps from becoming a loose loop while allowing the needle to pass. It does not mean pulling the fabric into a dimple. If the knot sits away from the surface, examine when you released the working thread. If the fabric puckers, check whether you tightened beyond the point where the knot had already settled. Repeat a short row on your sample, pausing to inspect each result, rather than rushing through a cluster and trying to diagnose all the differences afterward.
Match the knot size to the surrounding stitches
Start with the size requested in the chart. If you are designing your own motif, make several samples and choose the one that looks appropriate beside your actual crosses. Thread thickness and wraps both influence the result, but they are different variables. Changing both at once makes it difficult to understand why one sample behaves better than another. Keep a note of the strand count and wraps beside each trial so the successful combination can be repeated later.
A knot used as the centre of a small flower should support the petals rather than cover them. A knot used as an eye needs careful placement because a small shift can change the expression of the motif. Look at the sample from ordinary viewing distance as well as close up. A technically tidy dot can still be too large for the surrounding design. The principles in cross stitch flowers are useful when you are deciding how much detail a small botanical motif needs.
Avoid building a large loose stack of wraps merely to create a bigger dot. If the design needs substantially more texture, consider whether the chart calls for a different stitch or embellishment. Follow that instruction rather than treating every raised feature as an oversized French knot. When making an intentional adaptation, record it and test the visual effect on spare fabric. A bead is also a different construction choice, with different attachment and finishing requirements, as explained in beaded cross stitch.
Transfer the chart position accurately
Locate the intended position relative to nearby stitched landmarks. Count from a reliable point and check the chart's grid before inserting the needle. A knot may sit between crosses instead of taking the place of one, so do not assume that its symbol occupies an entire square. If several knots form a row or cluster, identify their separate positions first. Their raised shape can obscure part of the fabric grid once you begin working, which makes later counting harder.
Decide when to add the raised details
Many projects are easier to manage when the main crosses and other nearby stitching are complete before the knots are added. You can see the placement against the finished shapes and avoid repeatedly handling raised details while stitching around them. However, follow the specific pattern's sequence if it gives one. Plan any remaining hoop repositioning too: a knot placed under a hoop edge can be compressed, and repeated pressure may alter the appearance you worked to achieve.
Keep thread travel on the reverse deliberate. A long carry between widely spaced knots can become visible through light fabric or snag during later handling. End and restart the thread when that is the more suitable choice for the project rather than trying to connect every dot with one continuous length. Secure ends using a method appropriate to your materials and inspect the reverse without pulling on the raised stitches at the front.
Diagnose slipping, loose loops and uneven results
If the knot disappears into a fabric hole, inspect the entry position and compare the hole size with the knot you made. Returning through the same opening can allow the stitch to slip through, especially when the opening is large relative to the compact dot. Test a nearby separate entry on your sample while respecting the chart's visible position. Do not solve a placement problem by randomly enlarging every knot on the project; first identify why the original construction did not hold as intended.
If the knot forms a loose loop, review the control of the working thread while the needle passes through. The wraps may have moved away from the surface before settling. If the thread tangles instead, check for twists, rough thread or a difficult passage around the needle eye. Unpick a failed sample carefully rather than tightening a tangle until it becomes an irregular lump. A fresh attempt with smoother thread often gives you clearer information than repeatedly manipulating a damaged section.
Uneven knots are easier to diagnose when you change one thing at a time. Keep the same needle, fabric, strand count and wraps for a row of trials. Compare the placement, size and surface tension. Then make a second row with the single adjustment you want to test. This creates useful evidence for your own materials and hand movement. It is more reliable than collecting unrelated advice while changing several parts of the method at once.
Protect raised knots during finishing
Before cleaning or finishing, inspect the whole piece and follow the care instructions for its actual fabric, threads and embellishments. A French knot does not override those instructions. Avoid treating a care method suitable for one cotton sample as a guarantee for every mixed-material project. If the piece needs pressing, plan how to avoid flattening its raised details and follow the materials' guidance. Test the arrangement on a spare sample rather than applying pressure directly to an unfamiliar finished surface.
For framing, consider the space between the stitching and any glazing. Raised details need a finish that accommodates their depth rather than pressing them against the glass. Our framing guide covers the broader planning questions. For a fabric object, think about rubbing, folds and handling. A decorative dot on an occasionally displayed sampler faces different demands from a raised knot on a bag that regularly brushes against clothing.
Use the technique deliberately in your next design
Record the combination that gave you the best sample: fabric count, thread, strands, wraps and placement approach. Photograph it beside the surrounding crosses so you remember the scale, not just the isolated dot. If you later change fabric count or thread type, make another sample. The previous result is a useful starting point, but it is not proof that every material combination will produce the same appearance or ease of stitching.
Finally, choose knots because they contribute something clear to the design. A few well-placed dots can provide texture without overwhelming a small motif. Leaving other areas flat creates a useful contrast and keeps the raised details meaningful. A successful cross stitch French knot is not defined by its size or by how quickly you make it. It is a controlled stitch in the intended place, with an appearance that fits the chart and a finish that protects the work around it.
Choose an original chart from our free collection, or check your fabric measurements before you begin.
Free cross stitch patterns · Fabric calculator