
Getting started · 8 MIN READ
Cross stitch vs needlepoint vs embroidery
Understand the fabric, stitches and counting that set these related crafts apart.
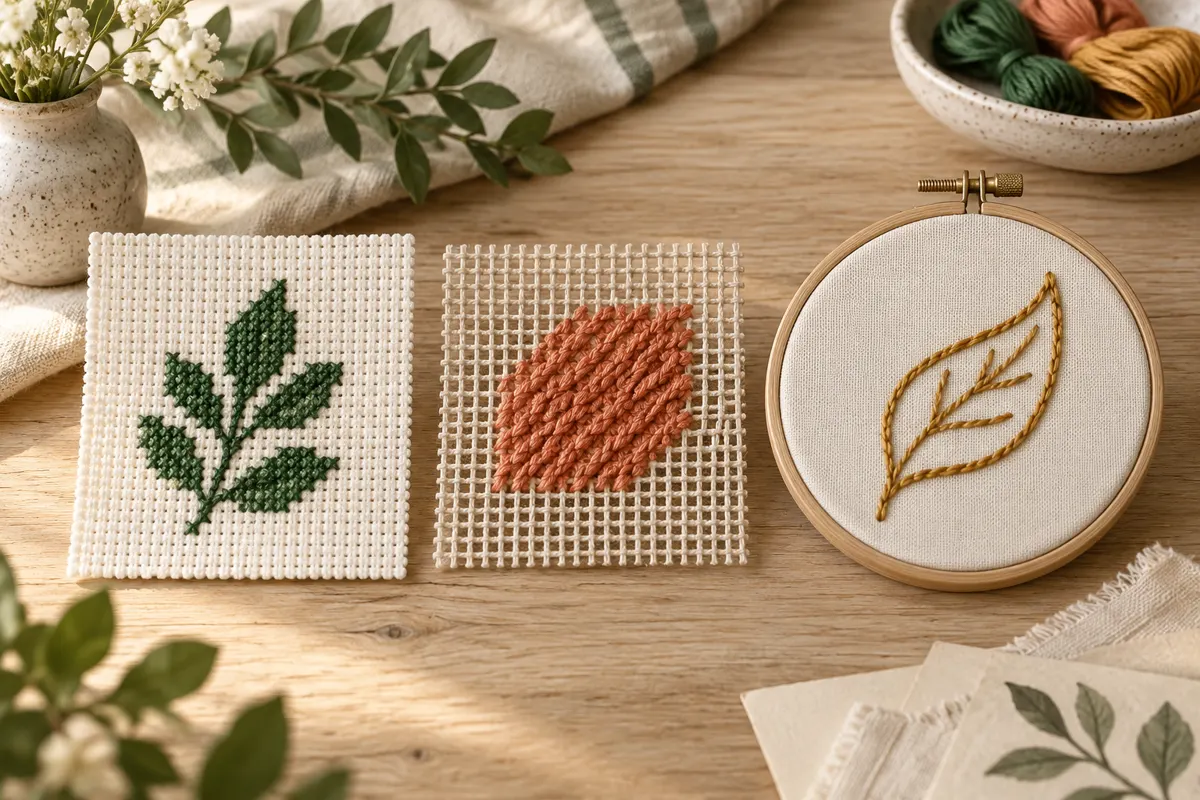
Three related terms, three useful distinctions
Embroidery is a broad name for decorating a material with stitches. Cross stitch is one embroidery technique, recognized by the little crosses used to build a design. Needlepoint usually refers to embroidery worked on an open canvas, often with stitches chosen to cover the canvas surface. These descriptions overlap in practice, but they help you understand what a kit or pattern is asking you to do.
The distinction is about the method and ground material, rather than a ranking of skill. A simple needlepoint project can be approachable, while a detailed cross stitch portrait can require many hours of counting. Free embroidery can involve just a few basic stitches or a wide range of advanced techniques. The best starting choice is the one whose instructions, materials and movements suit the project you want to make.
Before buying a kit, examine the actual instructions and contents. Does it include a counted chart, a printed outline or a painted canvas? Which stitches are expected? Is the fabric or canvas included, and is there enough thread for the stated method? These questions tell you much more than an attractive finished photograph or the general word embroidery on the product label.
How counted cross stitch builds a picture
In counted cross stitch, the chart provides a grid. Each marked square usually represents a stitch or a specified part of a stitch, with symbols identifying colors. You count positions on a compatible fabric and place the stitches accordingly. The design is not necessarily printed on that fabric. Accurate counting keeps the shapes in their intended positions, while consistent top diagonals give the surface a uniform appearance.
Aida provides obvious blocks for each full cross. Evenweave and counted linen use individual fabric threads, often with each cross spanning two threads in both directions. The same chart can therefore produce different physical dimensions on different counts. For example, a seventy-stitch row is five inches long at fourteen crosses per inch and approximately 3.89 inches at eighteen crosses per inch.
Cross stitch often leaves some background fabric visible. A sampler may contain separate letters and motifs surrounded by unstitched space. A full coverage chart fills most or all of its rectangular area, sometimes with many closely related shades. Both use the same counted principle, but the second can involve much more stitching and thread management. The fabric guide explains how the fabric affects the size and appearance.
Stamped cross stitch is another starting format
A stamped design supplies placement marks directly on the fabric, so you follow those marks rather than transferring every position from a separate counted chart. Check whether the printed marks are permanent or removable and follow the manufacturer's finishing instructions. Do not assume that every printed cross stitch kit uses the same preparation or washing method. The presence of a printed guide changes how you locate stitches, not the basic shape of the cross.
How needlepoint uses canvas
Needlepoint is generally worked on an open canvas whose holes provide stitch positions. Many projects cover the canvas with diagonal or decorative stitches. A painted canvas can indicate colors directly, while a counted needlepoint design uses a chart to locate them. You may encounter both approaches in shops, so ask which one a particular project uses before choosing it as a first lesson.
Tent stitch is a small diagonal stitch commonly associated with needlepoint. Different methods of working diagonal stitches can create different thread paths on the reverse and affect the finished canvas. Needlepoint can also use many decorative stitches that cover several canvas threads. Follow the method specified for your project rather than assuming every diagonal you see can be worked in any direction with the same result.
Canvas mesh describes its density, which affects the size of the stitch spaces and the thread needed to cover them. Match the thread and needle to the canvas and instructions. A thread suitable for one mesh or stitch may be too fine or too bulky for another. If you are adapting materials, make a sample first and inspect the coverage, tension and handling before starting the main design.
Painted does not mean there is no counting
A painted canvas gives a visual guide, but boundaries can still fall between stitch positions. You may need to interpret which hole belongs to which color or follow a stitch guide supplied by the designer. Check small details before starting rather than expecting the paint alone to answer every question. A counted needlepoint chart requires the same kind of careful positional checking used in other counted embroidery.
What free embroidery changes
In free embroidery, the placement of stitches is not restricted to a counted square grid. You might transfer an outline onto woven fabric and follow it with backstitch, fill a shape with satin stitch or create texture with other stitches. Stitch lengths and directions can vary with the design. The fabric still matters, but you generally do not calculate the picture size by dividing a chart's squares by fabric count.
A transferred outline can be traced, printed or marked by a method appropriate to the material. Check whether those marks can be removed and whether they remain visible after stitching. Some projects use a printed fabric intentionally as part of the design. Choose a transfer method because it suits your fabric and finish, rather than because it happened to work on someone else's cotton sample.
Free embroidery gives you flexible curves and lines without converting every detail into squares. That flexibility can be enjoyable, but it also asks you to judge stitch length, spacing and direction yourself. A counted chart offers more explicit positions. Neither approach eliminates decision-making; they simply place it in different parts of the process. Try a small sample of each if you are unsure which feels more comfortable.
Compare the supplies you actually need
A counted cross stitch starter project often uses counted fabric, stranded cotton, a blunt tapestry needle, scissors and a readable chart. A hoop or frame may help hold the fabric evenly. Many designs specify different working strand counts for crosses and outlines. The needle and thread guide explains how to prepare and test those combinations rather than treating the full six-strand bundle as one required working thread.
Needlepoint usually calls for the stated canvas, suitable thread or yarn, a tapestry needle and the design or stitch guide. The choice of frame depends on the canvas, stitches and personal working method. A kit may contain specialized threads intended for particular areas. Keep the labels and instructions with each thread so that sorting the colors does not separate them from essential handling information.
Free embroidery often uses a fabric suitable for the intended stitches, embroidery thread and a pointed needle that can enter between the fabric's woven threads. A hoop can help control the surface. However, the exact supplies vary widely by technique. Read the pattern before deciding that a cross stitch kit's needle, canvas or thread will transfer directly to another embroidery project.
Keep the working setup simple
Good light, a readable guide and a comfortable place to hold the work are useful in all three approaches. Prepare a small selection of supplies rather than buying an entire range before trying the technique. Keep sharp tools and loose needles stored securely when you stop. A short practice session gives you better evidence about what you need than a long accessory list chosen in advance.
Choose a first project by its decisions
For cross stitch, look for a chart with distinct symbols, a few connected color areas and mostly full crosses. A small geometric motif or short name gives you clear checkpoints. The easy pattern guide explains why a small picture with dozens of isolated colors can be harder than a larger shape with a simple structure.
For needlepoint, look for explicit beginner instructions identifying the stitch method, thread and canvas. A small design with a few colors can let you concentrate on consistent tension and the planned stitch direction. If a kit uses several decorative stitches, inspect the diagrams before choosing it. The number of colors alone does not describe the number of techniques you must learn.
For free embroidery, a modest outline with a limited stitch vocabulary lets you practise placement and spacing. A tiny drawing with intricate filled petals may still require careful control. Choose a design whose instructions show where stitches begin and end, and test the transfer method on a scrap. A clear practice goal is more useful than expecting to complete every kind of embroidery immediately.
Think about the final object before stitching
A cross stitch picture may be framed with some background visible, while a bookmark needs narrow dimensions and a durable edge finish. Needlepoint is often used for objects such as cushions or small decorative accessories, but the finishing requirements depend on the actual construction. Free embroidery can be displayed flat or added to fabric items when its materials and stitching suit that use.
Decide on the finish before cutting or choosing the ground material. Allow enough extra fabric or canvas for holding, centering, seams and mounting. A chart's stitched dimensions do not include those allowances automatically. The cross stitch fabric calculator helps with counted cross stitch arithmetic, while the construction instructions for a particular needlepoint or embroidery object determine its own required margins.
If you intend to frame a counted piece, consider how the mount supports the fabric without flattening raised stitches. Our framing guide discusses preparation and centering for cross stitch. A heavily textured embroidery or a shaped canvas object may need a different support or professional finishing. Match the method to the actual materials and thickness rather than to the broad craft name.
Read product descriptions with confidence
Look for the ground material, placement method, stitch list, finished dimensions and included supplies. A description that says embroidered picture could refer to several techniques. Counted chart indicates that you will translate positions from a guide; painted canvas indicates that color areas are already marked on a canvas; transferred outline indicates a different placement system. Ask for missing details before committing to an unfamiliar project.
Check what the stated size measures. It might be the design area, the fabric piece or the final framed object. For counted cross stitch, the fabric count and over-one or over-two method should make the design size understandable. For other embroidery, an outline or supplied canvas may define it directly. Confusing those measurements can lead to buying a frame or backing that does not fit.
Use the original free cross stitch charts if you want a small counted project to explore first. Try another embroidery method when its material and movement appeal to you, rather than treating one craft as a compulsory step toward another. Keep notes about what you enjoyed: precise counting, open-ended line work, color planning or surface texture. Those preferences help you choose your next project more reliably than the label on the kit alone.
Choose an original chart from our free collection, or check your fabric measurements before you begin.
Free cross stitch patterns · Fabric calculator