
Techniques · 8 MIN READ
How to grid cross stitch fabric without losing your place
A ten-by-ten guide can make counting easier, especially on a larger chart.
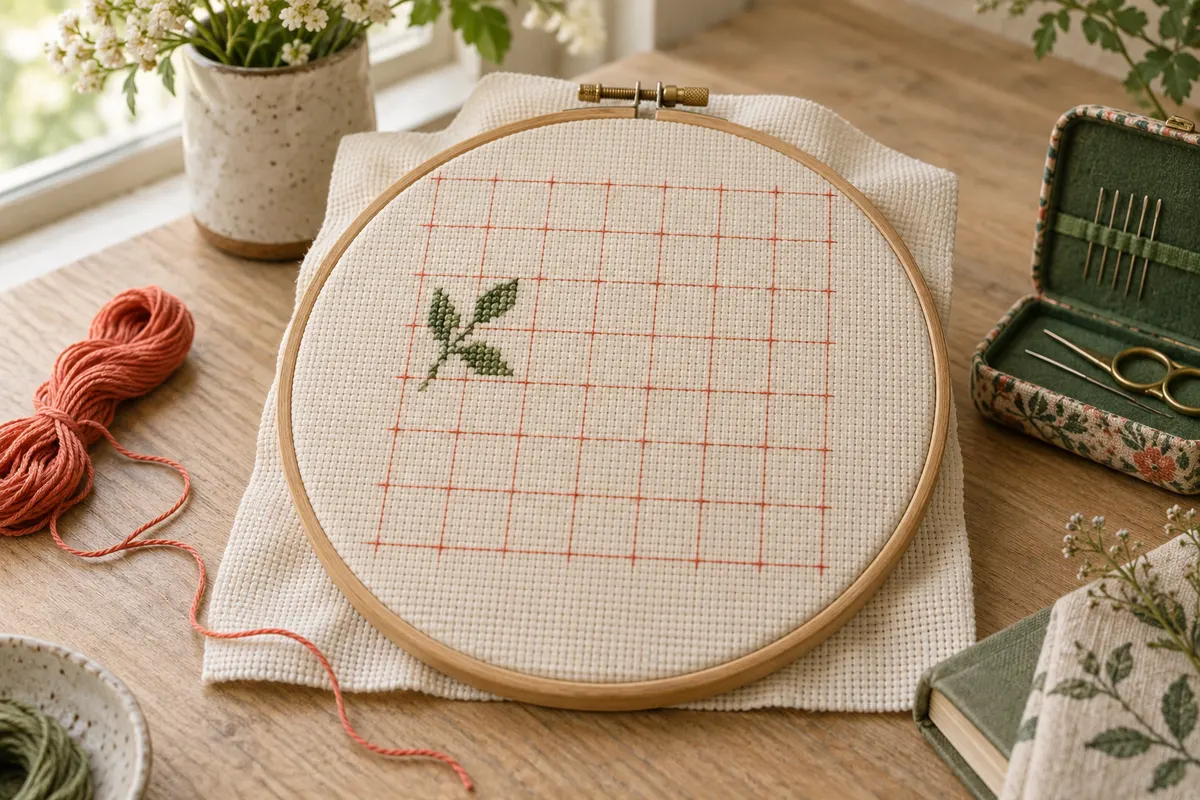
Use a grid as a counting aid
Gridding adds temporary reference lines to counted fabric so you can locate chart positions more easily. A typical grid divides the fabric into blocks corresponding to the stronger lines on the chart, often ten squares in each direction. It gives you nearby checkpoints instead of making you count every new stitch from a distant edge or center. The grid supports your counting, but it cannot correct an inaccurate chart interpretation or a misplaced starting line.
Consider whether the project actually needs it. A tiny connected motif may be easy to count from finished stitches, while a large design with separate shapes or similar colors may benefit from more reference points. Gridding takes preparation time and introduces material that must be removed or managed later. Choose it because it solves a specific counting problem, rather than assuming every piece of cross stitch must be fully gridded.
Read the chart's own grid system before adding anything to the fabric. Confirm the block size, center indicators and page overlaps. A line on a chart may indicate a boundary between squares, not a row that you should stitch. The beginner guide explains the relationship between chart squares and fabric blocks, which is essential before transferring a counting system onto the fabric.
Calculate the design area and margins first
Find the stitched width and height from the chart, then convert them using the effective stitches per inch. A one-hundred-and-forty by eighty-four stitch design on 14-count Aida measures ten by six inches before margins. If you choose three inches on every side for the intended finish, the fabric piece needs to be at least sixteen by twelve inches. Confirm the allowance against the actual mounting or construction method.
Use the fabric calculator if you are comparing counts or need centimetres as well as inches. On evenweave stitched over two threads, the effective stitch count is half the fabric's thread count. Gridding every ten fabric threads would therefore make five-cross blocks, rather than ten-cross blocks. Keep the distinction between woven threads and completed crosses clear throughout your measuring and marking.
Locate the center or another reliable starting reference, then check where the design edges will fall. Do not place a grid first and hope that enough margin remains around it. Decide whether you need the entire design gridded or only a few guide lines. A central cross and several verified boundaries may be sufficient for a moderately sized sampler without filling the whole fabric with temporary marks.
Identify the chart's center precisely
For an even number of chart squares, the center can fall between squares. For an odd number, it may fall through a central square. Inspect the arrows and grid instead of assuming the center always means the middle of a stitch. Write down how your chosen starting point relates to that position. This prevents a half-square interpretation from shifting the entire planned layout.
Choose a method you can remove safely
One approach uses a temporary thread designed or chosen for gridding. Another uses a fabric marking product suitable for the material. Each has different handling and removal requirements. Read the product instructions and test the complete process on a scrap of the same fabric before marking the main piece. Testing only whether a mark appears clearly does not tell you whether it will disappear after weeks of stitching.
A purpose-made removable gridding thread may be easier to distinguish from the embroidery thread. Whatever you use, check whether a needle can split it and whether it can be removed after nearby stitches are complete. If embroidery pierces the guide thread repeatedly, pulling it out later can become difficult. Avoid leaving a long untested thread permanently trapped beneath the stitched surface.
For marking products, follow the stated removal instructions and any warnings about heat, light or time. Ordinary pens, pencils and products marketed for unrelated uses are not interchangeable with tested temporary fabric markers. Some marks can remain or reappear under certain conditions. Choose a method that fits both the fabric and thread care requirements rather than planning a removal treatment that could damage the finished piece.
Test the finished combination
Stitch a few crosses near or across the proposed guide on a scrap, then remove the guide using the required method. Inspect both sides after the fabric dries or settles as instructed. This tests the interaction with the embroidery as well as the fabric. Keep a note of the exact product and process so you do not apply the result to a different marker or material later.
Count ten stitches correctly on Aida
A line marking a boundary needs to correspond to the boundary on the chart. Count the fabric blocks between guide lines, not merely the holes touched by them. Ten full crosses occupy ten blocks and have eleven boundary holes across their width. Confusing the number of holes with the number of squares can create a grid that is consistently one stitch too small.
Place a short first guide and count it twice. Then count the neighboring interval independently instead of copying its length by eye. Check the horizontal and vertical measurements separately. If you use stitched guide segments, remember that a segment may show only part of the boundary; its endpoints and any gaps still need to produce the correct spacing between actual ten-square divisions.
Work in a small area at first. A handful of verified blocks can reveal a misunderstanding before it spreads across the fabric. Label chart coordinates in your notes rather than writing permanent numbers onto the fabric. A grid is only useful if you know which chart boundary corresponds to which fabric line, especially when you return to a project after a break.
Count over-two fabric in crosses rather than threads
On evenweave worked over two, one cross spans two fabric threads horizontally and vertically. Ten crosses therefore span twenty fabric threads in each direction. Confirm that the grid lines fall on positions compatible with your chosen stitch placement. The fabric guide explains why 28-count over two behaves like fourteen crosses per inch for size calculations.
Count deliberately and keep the fabric relaxed. Distorting the weave in a tightly pulled hoop can make the spacing look uneven and make accurate counting harder. Use enough tension to see the threads without stretching them out of shape. If the material has an irregular linen texture, rely on thread counts instead of drawing lines that merely look equally spaced with a ruler.
Before gridding a large piece of unfamiliar fabric, stitch a few sample crosses. Check that each one occupies the intended structure and that the guide marks support that placement. A correct number of counted threads does not help if your crosses drift onto a different starting alignment. Keep the sample or notes so you can repeat the same approach across the project.
Verify the grid from more than one direction
Check a new line against the starting reference and an already verified neighboring line. For example, a boundary twenty squares to the right of the center should also be ten squares beyond the preceding ten-square boundary. If those two checks disagree, resolve the count before adding another line. Independent checks keep one small preparation error from becoming the reference for everything that follows.
Periodically compare a larger interval. Five ten-square blocks should span fifty chart squares, not just appear evenly distributed on the fabric. Count a known wider distance to catch cumulative mistakes. On a rectangular design, verify both dimensions near the far edge rather than assuming a correct first row guarantees a correct last row.
Check the chart's page overlap before mapping several pages onto the fabric. Some printed charts repeat a few rows or columns on adjacent pages to aid alignment. Those repeated squares belong to one part of the design, not an extra section. Mark the join on a working copy you are permitted to annotate, and retain the original chart so you can resolve uncertainty later.
Correct a guide before relying on it
If a grid interval is wrong, remove or correct that guide using a method suitable for its material. Do not simply remember that one block is short while continuing as though every boundary means ten stitches. Such exceptions are easy to forget and can lead to more expensive stitching corrections. A verified, modest grid is better than an extensive grid whose known errors remain unexplained.
Use the grid alongside completed stitches
When beginning a new area, locate it within the appropriate block, then compare its position with nearby completed stitches. The grid gives a broad reference; the existing design gives a second check. A leaf that starts two squares below one guide and three squares right of a stem should satisfy both relationships. This is more reliable than trusting either the temporary line or a single stitched reference alone.
Mark completed areas on a chart copy or in your permitted digital working file. The fabric grid does not record which crosses are finished. Our project tracker can record total progress and export a backup, but it also does not know individual stitch positions. Keep location notes and chart markings as well as the numerical progress count.
For a dense full coverage design, avoid treating grid lines as mandatory stopping edges. Stitch planning may need to account for visible tension differences, thread paths and the design's structure. The parking method guide discusses managing multiple working threads. Gridding can assist that method, but accurate thread identification and consistent counting remain separate responsibilities.
Remove guides and review the finish
Follow the removal process tested for your guide material. If thread guides were kept clear of embroidery, remove them gradually and watch for places where stitches have accidentally caught them. Do not pull hard against resistance. Inspect the area and release the trapped guide carefully without cutting the fabric or finished crosses. If a marking product is involved, follow its instructions and the care requirements of the stitched materials.
After removal, examine the fabric for residual marks, distortion and loose ends. Check it before mounting, because a frame can make later corrections difficult. The framing guide covers centering and supporting a completed piece. Keep the removal test and project notes if you used unfamiliar materials, so you can trace any issue to the actual process rather than guessing.
For your next project, decide how much gridding proved useful. You may prefer a complete grid for a large portrait and just a central reference for a small border. Our graph paper generator creates a printable square grid for sketching layouts and practicing chart counts; it does not transfer marks to fabric. Use each aid for the task it actually performs, and build your counting system around verified references.
Choose an original chart from our free collection, or check your fabric measurements before you begin.
Free cross stitch patterns · Fabric calculator