
Patterns · 8 MIN READ
Cross stitch samplers: combine motifs with a consistent layout
Plan an original sampler with related motifs, measured bands, a consistent palette and space for lettering or technique samples.
Decide what your sampler is for
Cross stitch samplers bring several elements into one composition. Yours might record techniques you are learning, combine original motifs for display, or include lettering and a date as a personal keepsake. Decide that purpose before collecting designs. A practice sampler benefits from clearly separated experiments and useful notes, while a decorative sampler needs a layout that reads as a complete picture. Trying to satisfy every possible purpose at once can make the project unnecessarily large and difficult to finish.
Write a short brief that names the intended finish, approximate stitched size and features you want to include. For example, you might plan four horizontal motif bands in a limited palette, with no lettering and a simple frame. That brief gives later choices a useful boundary. A motif can be appealing on its own without belonging in this particular composition. Keep unused ideas in a separate file rather than adding each one to the current chart.
Separate technique trials from the finished design
A trial area lets you compare thread coverage, tension or stitch types without needing every experiment to look decorative. Use matching spare fabric and label the combinations in your notes. Once you have chosen the successful techniques, bring those choices into the finished sampler. This keeps test results available while avoiding a display piece filled with experiments you no longer prefer. The beginner guide helps establish a consistent foundation for full-cross areas.
Choose related motifs and clear permissions
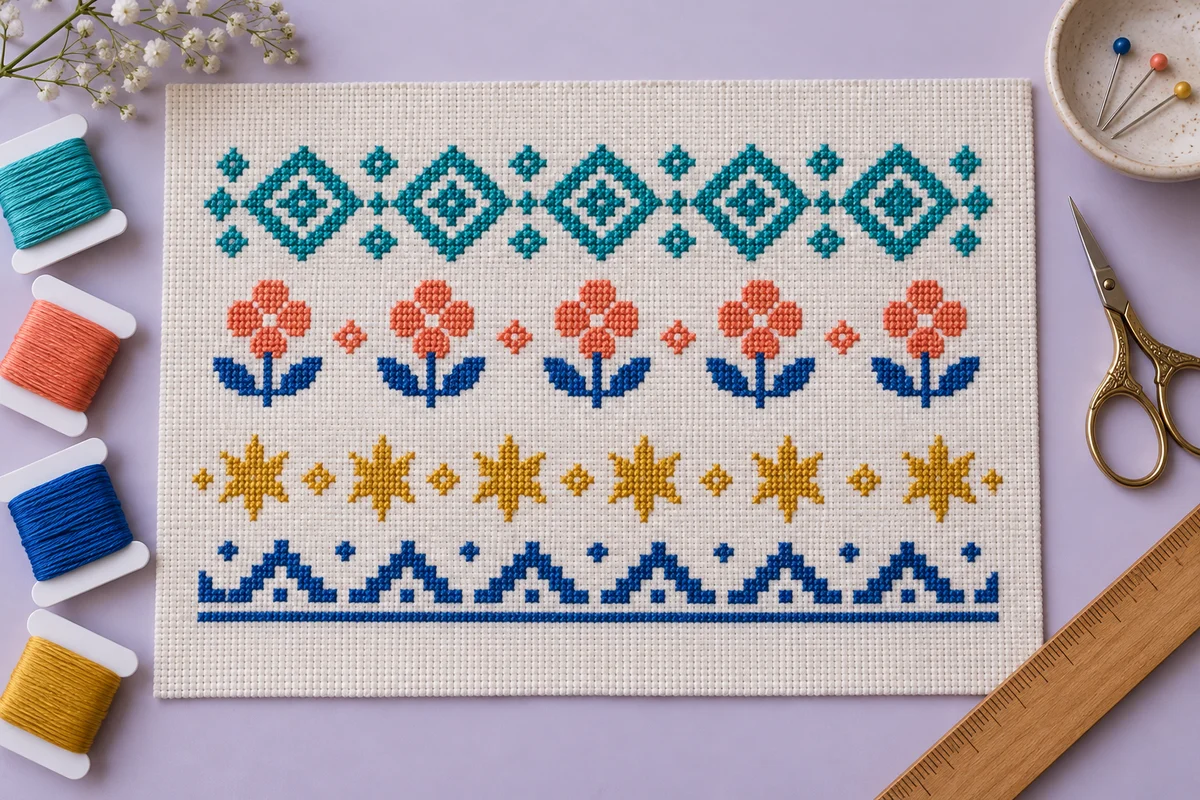
Select motifs that share a useful visual relationship. They might use similar proportions, a common geometric structure or a coordinated theme. A row of diamonds, a flower band and a star band can belong together when their widths, spacing and colors are deliberate. They do not need to depict the same object. What matters is whether the viewer can understand the arrangement without feeling that unrelated charts have simply been placed next to each other.
Draw original motifs or use charts whose terms permit your intended combination and use. A small motif taken from a larger chart does not lose the permissions attached to that source. Check redistribution separately from permission to stitch a personal piece, especially if you plan to publish the resulting combined chart. Keep source and permission information in your project notes. Avoid assuming that a design is freely reusable merely because it appears traditional or is easy to find online.
Start with a few motifs rather than a complete page of possibilities. Put them on a common grid and compare their heights, visual weight and color density. A mostly empty outline can look much lighter than a filled block of the same dimensions. The grid designer can help you build original elements, while modern cross stitch patterns discusses the role of strong shapes and deliberate blank space.
Establish the overall grid and palette
Choose a maximum stitched width for the composition. Each band can occupy that full width or sit within it with intentionally different margins. Mark the centre line and useful alignment points before arranging the motifs. A common centre gives differently sized bands a clear relationship, while aligned left and right edges can make a more structured layout. Decide which arrangement you want rather than switching between them without a reason.
Use a palette across the whole sampler, not a separate unrelated palette for every band. You can vary which color dominates each section while repeating selected accents. For example, turquoise diamonds, coral flowers with blue leaves and golden stars can feel coordinated when a blue border links the composition. Test the actual thread colors on the intended fabric. A screen preview helps with planning but does not establish the appearance of physical thread under your normal lighting.
Keep the key consistent across sections
If the same symbol means the same thread throughout the chart, checking becomes easier. If symbols change meaning between sections, label those sections and their keys unmistakably. Also record strand counts and special-stitch instructions. Do not assume that a stitcher's memory of the first band will explain every later band. A sampler with several techniques needs a key that preserves those distinctions without making the reader hunt through unrelated notes.
Calculate bands, gaps and the complete size
Measure every band's height and width in stitches. Add the blank rows between bands and any surrounding border to determine the complete stitched dimensions. The width of the largest motif alone does not describe the whole sampler if borders extend beyond it. Likewise, adding only the motif heights ignores the deliberate spaces separating them. Keep a layout table in your notes with each element's starting row, ending row and horizontal position.
Suppose four bands are 9, 15, 11 and 7 stitches high, with 5 blank rows between consecutive bands. Their combined height is 57 stitches: 42 stitched rows across the bands plus 15 blank rows in the three gaps. On 14-count Aida, that composition is approximately 4.07 inches high before any additional border. Use the fabric calculator to check the final chart dimensions, then add separate allowances for the intended frame or textile construction.
Repeated motifs need a similar calculation horizontally. Five motifs each 9 stitches wide, separated by 3 blank columns, occupy 57 columns: 45 for the motifs and 12 for the four internal gaps. Decide whether the band also needs space at either end. If a border must meet a particular width, revise the repeat or spacing on the chart before stitching. An awkward partial repeat is easier to notice and resolve in a paper layout than on nearly completed fabric.
Place lettering and focal details deliberately
If your sampler includes a name, date or short phrase, chart the complete text before stitching any letters. Count its total width, including spaces and punctuation. A line can fit the planned width while still appearing unbalanced because the visible shapes have different weights. The name maker and alphabet guide can help you plan the actual lettering block rather than estimating from a few example characters.
Decide whether the lettering is the main feature or a supporting detail. A large name in the centre gives the motif bands a framing role, while a small date at the bottom can act as a quiet record. Keep enough blank rows around the text to separate it from adjacent ornament. Avoid shrinking every space simply to include one more motif. A larger composition or a shorter text line may preserve readability more effectively.
Review the composition at normal viewing size
Look at the complete design at approximately its finished physical size. An enlarged chart makes small letters and narrow gaps easier to see than they will be on the fabric. Check which feature attracts attention first and whether that matches your brief. A very dark band can dominate even when it is short, while a pale outline may recede. Adjust the palette or spacing deliberately rather than assuming equal stitch counts produce equal visual weight.
Plan counted reference points and a stitching sequence
Identify the chart centre and map important bands relative to it. Choose reference points you can verify as the work progresses. A band may be positioned from the centre line, the edge of a checked border or a completed motif, but that reference needs confirmation before you build more stitching around it. If the first band is misplaced, copying its position can spread the mistake through the composition.
Decide whether you will work one band at a time or complete selected colors across several sections. Both approaches can be useful when the chart and thread travel are considered. Keep long reverse carries deliberate and avoid connecting distant isolated motifs merely to reduce the number of thread starts. A relatively open sampler can reveal dark carries through lighter fabric, so inspect the reverse and the front under normal lighting as you work.
Pause after meaningful layout milestones. Check the first repeat, the full first band and the spacing before starting the next section. Compare both sides of a centred band with the chart. These short checks can prevent extensive unpicking later. The project tracker can record which sections are stitched and checked separately, so completed-looking areas are not mistaken for verified ones after a break.
Test special stitches without crowding the sampler
A sampler can introduce raised details, backstitch or another technique, but each addition should have clear instructions and a reason to be there. Test unfamiliar stitches on matching spare fabric before adding them to the finished composition. Compare their size and texture against the surrounding crosses. A technique that looks attractive in isolation may be too prominent when repeated across a small band.
For raised knots, check placement, strand count and wraps according to the pattern. The French knot guide explains how a compact raised dot differs from a full cross in a counted square. For beads, plan their attachment and the space needed during finishing using the beaded cross stitch guide. Do not treat different raised details as automatically interchangeable simply because they occupy similar positions on a chart.
Consider the order of the remaining work and how the fabric will be held. Raised details can be compressed by a hoop edge or handled repeatedly while adjacent areas are stitched. Follow the chart's sequence where one is provided and plan repositioning carefully. Keep special-stitch materials labelled with the relevant instructions so they remain distinct from the thread used for full-cross bands.
Finish and preserve the complete composition
Inspect the sampler against the final chart before trimming or mounting. Check motif repeats, text, dates, spacing and thread ends. Keep the finishing margins intact until you have confirmed the construction method. Follow care instructions for all actual materials, including embellishments, rather than applying a single cleaning method to every stitched piece. If the sampler will be framed, the framing guide explains broader planning questions around support and visible margins.
Save the complete chart, key, dimensions and any adaptations together. A photograph records the appearance, but construction notes explain the fabric count, palette and technique choices that produced it. If you share an original chart, provide clear instructions and distinguish stitched dimensions from required fabric size. A successful cross stitch sampler combines varied details through a consistent layout. Its balance comes from checked dimensions, purposeful spacing and a finish that lets the complete composition be enjoyed.
Choose an original chart from our free collection, or check your fabric measurements before you begin.
Free cross stitch patterns · Fabric calculator